Polymer clay - tutorijali |
Odgovori 
|
Stranica 12> |
| Korisnik | ||||||||||||||||||||||||||||||||||||||||||||||
monna-1 
Trajnica 

Pridružen: 18 Travanj 2008 Lokacija: Croatia Status: Offline Bodovi: 2598 |
 Opcije poruke Opcije poruke
") Hvala(0) Hvala(0)
 Citiranje Odgovor Citiranje Odgovor
 Tema: Polymer clay - tutorijali Tema: Polymer clay - tutorijaliObjavljeno: 02 Rujan 2009 u 09:59 |
|||||||||||||||||||||||||||||||||||||||||||||
|
Ovdje možemo stavljati načine izrade predmeta u polimer glini, fimu, sculpeju, gipsu i sličnim materijalima.
|
||||||||||||||||||||||||||||||||||||||||||||||
 |
||||||||||||||||||||||||||||||||||||||||||||||
| Sponzorirani linkovi | ||||||||||||||||||||||||||||||||||||||||||||||
|
||||||||||||||||||||||||||||||||||||||||||||||
|
monna-1
Trajnica
Pridružen: 18 Travanj 2008 Lokacija: Croatia Status: Offline Bodovi: 2598 |
Opcije poruke
Hvala(0)
Citiranje Odgovor
Objavljeno: 02 Rujan 2009 u 10:00 |
|||||||||||||||||||||||||||||||||||||||||||||
How to make a mould of your own design?This how-to will show you how to make a mould of your own design with the card board method.
It's not meant for big objects but it works really well for small, conical objects. Here is what you need: cutting mat, cutting knife, ruler, scissors, turning table, clay, plaster, plastic, tape, empty container  First you have to measure the diameter of your turning table. First you have to measure the diameter of your turning table. Also measure the height from table till the surface. Also measure the height from table till the surface. Then outline these measurements on the cardboard. Then outline these measurements on the cardboard.  Cut it out. Cut it out. Then draw half of your design onto the cardboard. Then draw half of your design onto the cardboard. Cut it out. Cut it out. This is the result: it will be a little cup. This is the result: it will be a little cup. Then hold the cardboard regularly onto the turning table and add clay in the middle. Then hold the cardboard regularly onto the turning table and add clay in the middle. Fill the gap in the middle with clay and turn the turning table a little to see where there are more gaps to be filled. Fill the gap in the middle with clay and turn the turning table a little to see where there are more gaps to be filled. Then make it smoother as you go along. I use old credit cards and not valid passes for that. Then make it smoother as you go along. I use old credit cards and not valid passes for that. Wile you hold the cardboard on one side, turn with the turning table to see if you need to add or take away more clay. Wile you hold the cardboard on one side, turn with the turning table to see if you need to add or take away more clay. When you think it's OK, take a fexible rib to smoothen it nicely. When you think it's OK, take a fexible rib to smoothen it nicely.It's important that it's smooth as plaster will take over every little bump.  Then make a ring from sturdy plastic & place it over the clay cup. Then make a ring from sturdy plastic & place it over the clay cup. Add clay along the sides so that no plaster can escape. Add clay along the sides so that no plaster can escape. Make the plaster in a container. I always use the pyramid method which means that I add plaster onto a pyramid and when it doesn't soak up any water anymore, there is enough plaster added. Then I mix it with my hand. It has to have a yoghurt like substance. Make the plaster in a container. I always use the pyramid method which means that I add plaster onto a pyramid and when it doesn't soak up any water anymore, there is enough plaster added. Then I mix it with my hand. It has to have a yoghurt like substance. Hold your hand above the piece and pour the plaster onto it while your hand guides where it should go. Hold your hand above the piece and pour the plaster onto it while your hand guides where it should go. Wiggle a bit with the plastic to get airbubbles out. Wiggle a bit with the plastic to get airbubbles out. Let it set and then remove the clay and plastic around it. Let it set and then remove the clay and plastic around it. Then cut away the sharp edges. Then cut away the sharp edges. Now the mould has to dry and then it can be used. Now the mould has to dry and then it can be used.
Preuzeto s net-a. |
||||||||||||||||||||||||||||||||||||||||||||||
|
||||||||||||||||||||||||||||||||||||||||||||||
|
monna-1
Trajnica
Pridružen: 18 Travanj 2008 Lokacija: Croatia Status: Offline Bodovi: 2598 |
Opcije poruke
Hvala(0)
Citiranje Odgovor
Objavljeno: 02 Rujan 2009 u 10:03 |
|||||||||||||||||||||||||||||||||||||||||||||
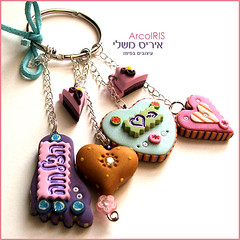
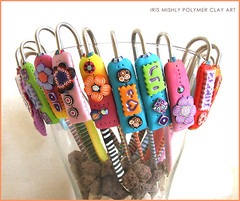
How to make a colourful key chain?This is a very quick and easy project where even toddlers can help with: a colorful keychain.
Preuzeto s net-a.
Here is what you need: A piece of scoubidoo thread, colorful wooden beads with a big hole, a keyring.  Fold the scoubidoo thread in half. Fold the scoubidoo thread in half. Then slip the keyring a little bit over the thread. Then slip the keyring a little bit over the thread. Slip the ends of the scoubidoo thread through the loop and pul firmly. Slip the ends of the scoubidoo thread through the loop and pul firmly. Then start adding beads on both ends of the scoubidoo threads. Then start adding beads on both ends of the scoubidoo threads. Tie a knot at the ends of the threads. Tie a knot at the ends of the threads. Cut off the remaining ends of the scoubidoo thread. Cut off the remaining ends of the scoubidoo thread. And here is the result: it's our keychain to our mailbox. And here is the result: it's our keychain to our mailbox. |
||||||||||||||||||||||||||||||||||||||||||||||
|
||||||||||||||||||||||||||||||||||||||||||||||
|
monna-1
Trajnica
Pridružen: 18 Travanj 2008 Lokacija: Croatia Status: Offline Bodovi: 2598 |
Opcije poruke
Hvala(0)
Citiranje Odgovor
Objavljeno: 02 Rujan 2009 u 10:06 |
|||||||||||||||||||||||||||||||||||||||||||||
How to make a Giacometti statue?Do you know the work of Giacometti?
Preuzeto s net-a.
He was a Swiss sculptor, painter, draftsman and printer. His trademark are the stretched statues that look like they are never ending. In this how to, I will show you how to make a similar statue so that you can make your own Giacometti. It looks a bit messy but it's fun to make - especially with children - and the result is super! Here is what you need: plaster, a plastic yoghurt container, plaster of Paris bandages, a container with a bit of water, black ecoline, wire, paper tape, clothespins and scissors.  Cut two small pieces of wire and fold them double. Cut two small pieces of wire and fold them double. Clasp the folded pieces of wire between a clothespin. Add another clothespin on the other side so that it can rest on a container later. Clasp the folded pieces of wire between a clothespin. Add another clothespin on the other side so that it can rest on a container later. Cut off the upper part of the plastic yoghurt container. Cut off the upper part of the plastic yoghurt container. Fill it with plaster. Fill it with plaster. Take the clothespegs and make 'em rest on the yoghurt container. Make sure that the ends of the wire are in the plaster. We will attach the legs of our statue onto them later on. Take the clothespegs and make 'em rest on the yoghurt container. Make sure that the ends of the wire are in the plaster. We will attach the legs of our statue onto them later on. While the feet set, you can work on the body. We make it with wire and paper tape. While the feet set, you can work on the body. We make it with wire and paper tape.Cut a piece of wire of about 60cm or 24 inches and fold it double.  Make a loop in the middle and twist it around a bit. This will be the head. Make a loop in the middle and twist it around a bit. This will be the head.Cut a piece of wire of about 50cm or 20inches and fold it double towards the middle where you attach it onto the body beneath the head. Make sure to make a little loop for the hands too.  Twist the body to create a belly and legs. Twist the body to create a belly and legs. Then start putting paper tape around the wire to create a bit of tickness. Then start putting paper tape around the wire to create a bit of tickness. When that's done, it kind of looks like a mummy. When that's done, it kind of looks like a mummy. Now take the little yoghurt container with the plaster and cut away the plastic. Now take the little yoghurt container with the plaster and cut away the plastic. Then attach the legs to the bottom part. Then attach the legs to the bottom part. This is how it will look. This is how it will look. Then cut pieces of the plaster bandages of about 15cm or 6inches and cut them in half again. Then cut pieces of the plaster bandages of about 15cm or 6inches and cut them in half again. Now put the strips very shortly in a bit of water. Now put the strips very shortly in a bit of water. Then drape the pieces around the frame. Then drape the pieces around the frame. Let it dry for a while and when it's nearly dry, apply ecoline paint to it. Let it dry for a while and when it's nearly dry, apply ecoline paint to it.Doing this while the plaster is still damp, it will give an antique effect to the statue.  So, here is the result: So, here is the result: |
||||||||||||||||||||||||||||||||||||||||||||||
|
||||||||||||||||||||||||||||||||||||||||||||||
|
monna-1
Trajnica
Pridružen: 18 Travanj 2008 Lokacija: Croatia Status: Offline Bodovi: 2598 |
Opcije poruke
Hvala(0)
Citiranje Odgovor
Objavljeno: 02 Rujan 2009 u 10:07 |
|||||||||||||||||||||||||||||||||||||||||||||
How to make a macramé doll?I'm sure you had a go at macramé at least one time in your life. It used to be immensely popular and owls and plant hangers were made abundantly. Among kids, macramé is used to make little friendship bracelets and the use of different colors of yarn makes it a fun activity.
This tutorial shows you how to make a macramé doll which you can use as a promotional item, add it to your giftwrapping, make a key chain from it, add it to party favor bags,... Here is what you need: cotton twine, tape, scissors, a waterproof liner, wooden beads  Cut a piece of twine, fold it double and tape it onto the table with the folded side on the bottom. Cut a piece of twine, fold it double and tape it onto the table with the folded side on the bottom. Cut another piece of twine and put it underneath the folded twine. Cut another piece of twine and put it underneath the folded twine. Then take the end of the twine underneath and put it on top of the folded twine. Then take the end of the twine underneath and put it on top of the folded twine. Now take the twine on the right hand, put it underneath the folded twine and make sure you put the end of the twine through the loop you created first. Now take the twine on the right hand, put it underneath the folded twine and make sure you put the end of the twine through the loop you created first. Now pull on both sides. Your first macramé knot is ready. Now pull on both sides. Your first macramé knot is ready. Repeat the above process a few times. Always put the twine over the folded thread where you see the little bump (right in this picture) Repeat the above process a few times. Always put the twine over the folded thread where you see the little bump (right in this picture) Then you go with the twine through the loop on the other side. Then you go with the twine through the loop on the other side. Make about 5 knots. Make about 5 knots. Then you pull the wooden bead through the folded part of the twine. Then you pull the wooden bead through the folded part of the twine. You see a loop on top of the head now. This might be too long so pull the little doll's legs until you think it's long enough. Leave room to make a knot too. You see a loop on top of the head now. This might be too long so pull the little doll's legs until you think it's long enough. Leave room to make a knot too.  Then make knots on all the ends of the doll for the arms and legs. Then make knots on all the ends of the doll for the arms and legs. Cut off the twine that is too much. Cut off the twine that is too much. Draw a little happy face on the wooden bead. Draw a little happy face on the wooden bead. The little macramé doll is ready to conquer the world now... The little macramé doll is ready to conquer the world now...
Preuzeto s net-a. |
||||||||||||||||||||||||||||||||||||||||||||||
|
||||||||||||||||||||||||||||||||||||||||||||||
|
monna-1
Trajnica
Pridružen: 18 Travanj 2008 Lokacija: Croatia Status: Offline Bodovi: 2598 |
Opcije poruke
Hvala(0)
Citiranje Odgovor
Objavljeno: 02 Rujan 2009 u 10:09 |
|||||||||||||||||||||||||||||||||||||||||||||
How to make a plaster stamp?Since I was making a few moulds today, I remembered that I planned to make a tutorial on how to make a plaster stamp. Plaster stamps are not hard to make and they are great fun to use in your modelling projects. You can use regular stamps too but they are much softer so somtimes it's hard to use them for pressing into clay.
Here is what you need: a rolling pin, a cutter, a stamp and a piece of plasticine.
Plasticine is soft clay made of plastic so when you poor the plaster in there, it will come off very easily afterwards.  Take a piece of plasticine and kneed it a little bit. Take a piece of plasticine and kneed it a little bit. Make a flat piece with a rolling pin. Make it about 0,5cm or 0,2inch thick Make a flat piece with a rolling pin. Make it about 0,5cm or 0,2inch thick Press a stamp into the flat piece or plasticine. Press a stamp into the flat piece or plasticine. Make it nice and round with a cookie cutter. Make it nice and round with a cookie cutter. Roll a flat piece of plasticine and twist it around the stamped piece. Roll a flat piece of plasticine and twist it around the stamped piece. Let the ends cross each other and cut the excess plasticine away with a knife. Let the ends cross each other and cut the excess plasticine away with a knife.
Preuzeto s net-a. |
||||||||||||||||||||||||||||||||||||||||||||||
|
||||||||||||||||||||||||||||||||||||||||||||||
|
monna-1
Trajnica
Pridružen: 18 Travanj 2008 Lokacija: Croatia Status: Offline Bodovi: 2598 |
Opcije poruke
Hvala(0)
Citiranje Odgovor
Objavljeno: 02 Rujan 2009 u 10:15 |
|||||||||||||||||||||||||||||||||||||||||||||
How to make and use a positive mould?When you make a positive mould, you press clay onto the mould instead of into the mould.
Usually you work with clay plaques and that's what I'm going to do too! First I'll show you how to make the mould, which is a piece of cake, and then I'll make a little plate that you can use for fruit, chocolates, tealightholders,... Here is what you need: a bowl, liquid bees wax, paintbrush, plaster, container to mix plaster. I usually use old ice cream containers because that allows me to eat icecream! :)  Take some liquid bees wax and brush it into the surface of the bowl. This will make sure that the plaster won't get stuck on the glass. Take some liquid bees wax and brush it into the surface of the bowl. This will make sure that the plaster won't get stuck on the glass. Make some plaster ready in the plastic container. Mostly it is made with 1 part of water and 3 parts of plaster but it depends on the kind of plaster you use. Make some plaster ready in the plastic container. Mostly it is made with 1 part of water and 3 parts of plaster but it depends on the kind of plaster you use.I always go with the pyramid method: you poor the plaster into the water at the same place and a pyramid will form. When the pyramid doesn't suck any water anymore, it's enough plaster and you can start mixing it with the water. If you like that the plaster will set quickly, you can use lukewarm water or add a pinch of salt.  Mix the plaster with the water. If you don't want rough hands, you better wear gloves. Mix the plaster with the water. If you don't want rough hands, you better wear gloves. Then poor the plaster in the bowl. Then poor the plaster in the bowl. Shake a little bit with the bowl so that the airbubbles that are in the plaster can come out. Let it set for about an hour. Shake a little bit with the bowl so that the airbubbles that are in the plaster can come out. Let it set for about an hour. Then you can take the mould out of the bowl. It's a perfect round & very smooth. It's still damp and needs to dry a few days befor you can use it. I usually put it in the sun,on the radiator or on the lid of the kiln so that it dries quicker. Then you can take the mould out of the bowl. It's a perfect round & very smooth. It's still damp and needs to dry a few days befor you can use it. I usually put it in the sun,on the radiator or on the lid of the kiln so that it dries quicker. The mould is dry so now we can use it. Take a piece of clay. The mould is dry so now we can use it. Take a piece of clay. Put it in between two wooden sticks. Put it in between two wooden sticks. Use the rolling pin to roll the clay flat. Use the rolling pin to roll the clay flat. When the clay is rolled out, make it a bit smooth with an old credit card. When the clay is rolled out, make it a bit smooth with an old credit card.  Then place a square piece of paper on top of it and cut away all the edges so that a nice square remains. Then place a square piece of paper on top of it and cut away all the edges so that a nice square remains. I usually put flat pieces on a flat plate of plaster and go over it with a credit card again so that there are no bumps. I usually put flat pieces on a flat plate of plaster and go over it with a credit card again so that there are no bumps. Then you take the square and drape it over the mould. Then you take the square and drape it over the mould. The mould will suck the water out of the clay & the shape will remain. The mould will suck the water out of the clay & the shape will remain.After a few hours, you can take the dish away from the mould and it looks like this.  I'm too impatient to show it to you when it's fired & glazed, so I just put some chocolates on there so you can see how it will look when it's totally done! :) I'm too impatient to show it to you when it's fired & glazed, so I just put some chocolates on there so you can see how it will look when it's totally done! :) You can also use the mould in a different way to make a bowl. You can also use the mould in a different way to make a bowl.When the clay plaque is rolled out, you drape it onto the mould.  Then take a little wet sponge and press it gently against the mould. Then take a little wet sponge and press it gently against the mould. Take away some of the excess clay around the mould. Take away some of the excess clay around the mould. Then with a soft rib you go over the clay plaque and press it gently against the mould and make it all smooth. Then with a soft rib you go over the clay plaque and press it gently against the mould and make it all smooth. Cut away the excess clay. Cut away the excess clay. Finish the edges smoothly with the soft rib and let it dry slowly upside down. Finish the edges smoothly with the soft rib and let it dry slowly upside down. This bowl holds even more chocolates I think! :) This bowl holds even more chocolates I think! :) Preuzeto s net-a.
|
||||||||||||||||||||||||||||||||||||||||||||||
|
||||||||||||||||||||||||||||||||||||||||||||||
|
monna-1
Trajnica
Pridružen: 18 Travanj 2008 Lokacija: Croatia Status: Offline Bodovi: 2598 |
Opcije poruke
Hvala(0)
Citiranje Odgovor
Objavljeno: 02 Rujan 2009 u 10:18 |
|||||||||||||||||||||||||||||||||||||||||||||
How to make colored glaze?The easiest way to get a glaze is buy a ready made one in your ceramic supply shop. For those who like to experiment a bit more, you can mix 'em yourself.
That's what I often do. It's a bit more work but it's cheaper and the surprise is bigger when you open the kiln! :) I never tried to make a red glaze yet so I decided to try if it would work with red iron oxide. Here is what you need: Transparant glaze powder (also that you can make yourself but at the moment I use ready made), oxide/pigments/stains, a sieve with a very small mesh, water, containers with a tight lid, a protective mask, a brush, a spoon, some paper and a scale.
Preuzeto s net-a. |
||||||||||||||||||||||||||||||||||||||||||||||
|
||||||||||||||||||||||||||||||||||||||||||||||
|
monna-1
Trajnica
Pridružen: 18 Travanj 2008 Lokacija: Croatia Status: Offline Bodovi: 2598 |
Opcije poruke
Hvala(0)
Citiranje Odgovor
Objavljeno: 02 Rujan 2009 u 10:22 |
|||||||||||||||||||||||||||||||||||||||||||||
|
||||||||||||||||||||||||||||||||||||||||||||||
|
||||||||||||||||||||||||||||||||||||||||||||||
|
monna-1
Trajnica
Pridružen: 18 Travanj 2008 Lokacija: Croatia Status: Offline Bodovi: 2598 |
Opcije poruke
Hvala(0)
Citiranje Odgovor
Objavljeno: 02 Rujan 2009 u 10:26 |
|||||||||||||||||||||||||||||||||||||||||||||
|
||||||||||||||||||||||||||||||||||||||||||||||
|
||||||||||||||||||||||||||||||||||||||||||||||
|
monna-1
Trajnica
Pridružen: 18 Travanj 2008 Lokacija: Croatia Status: Offline Bodovi: 2598 |
Opcije poruke
Hvala(0)
Citiranje Odgovor
Objavljeno: 02 Rujan 2009 u 10:30 |
|||||||||||||||||||||||||||||||||||||||||||||
|
Image Transfer Tutorial
If like to try out an alternative for those expensive iron-on, then maybe you should have a look at this! I love this transfer technique, it's cheap, easy and fun because you can achieve different "looks": from distressed to crisp images...it's worth a try!
What do you need:
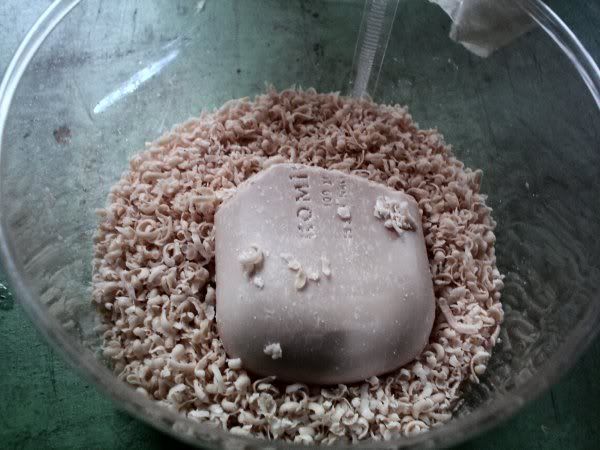 soap shavings 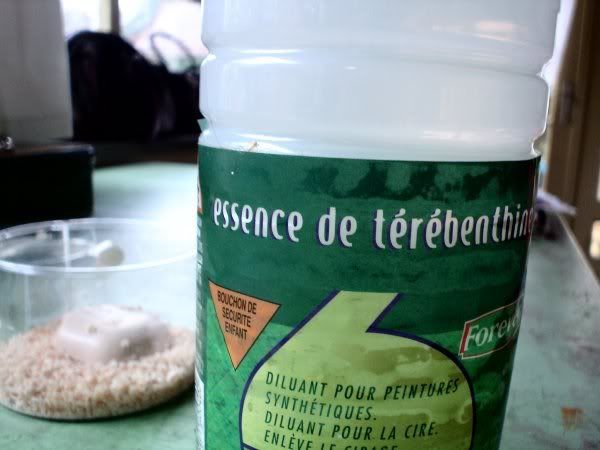 turpentine
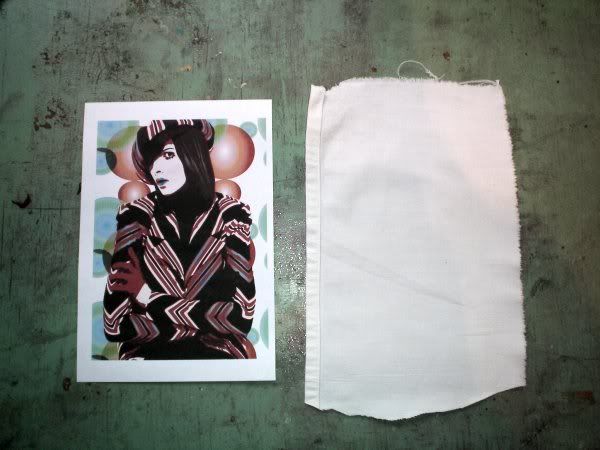 a piece of fabric and a fresh inkjet print
and : a well ventilated workspace!
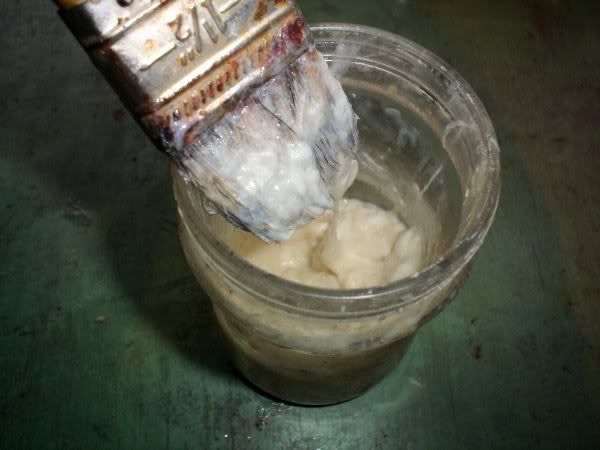
Get a cup and fill it 1/4 with hot water, add two tabelspoons of soap shavings and stir. Then add a table spoon of turpentine and keep stirring until it looks like this:
 Now we're ready to print! get your piece of paper and apply the soap and turpentine mix to the front of your print:
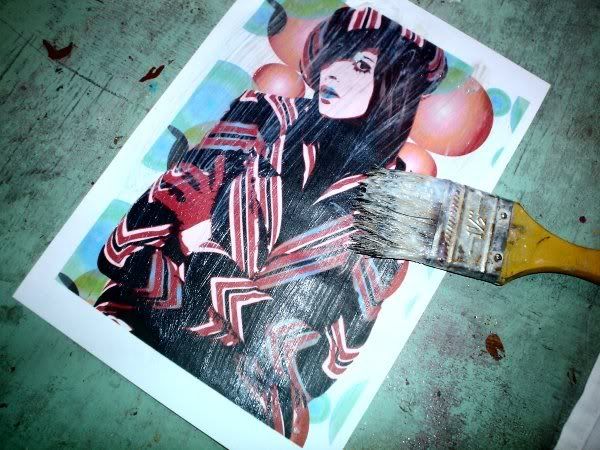 Then put it face down on your piece of fabric. Press it down firmly and apply the mix to the back. The paper will become slightly transparant. The mix can be applied quite thick, as long as you are careful not to rip up the paper. I like to use my hands to rub down the print, but a spoon is very handy too, it depends of the effect you desire:
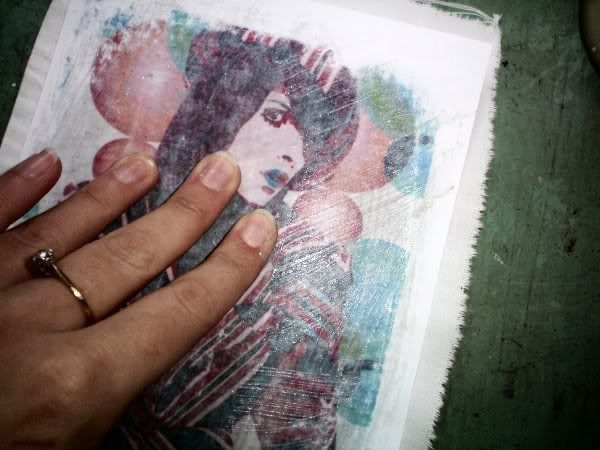 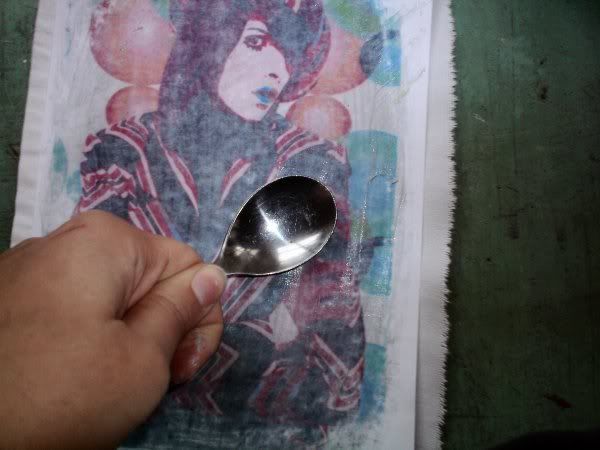 Now peel back carefully ...and there it is!
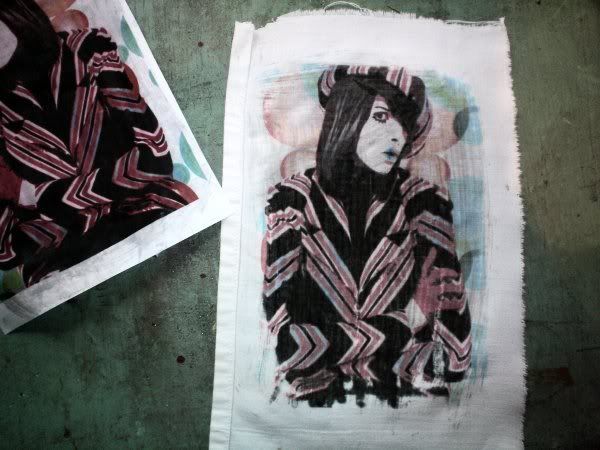 How to "set" the print
Of course you don't want your image to fade after the first wash, but please note that that transfer technique is experimental : depending on the mix and amount of soap and turpentine you will get a stronger or weaker print. There are a few tricks for settings the transfer though:
Let your transfer dry for 24 hours. Get a spraying can ( you know, for spraying or watering your plants) and fill it with 50% water and 50% white vinegar. Spray it on the transfer and let it dry. After that you have to iron your transfer on high temperature or use a heat press. Repeat the last two steps( (spraying can and ironing) a few times, but don't rinse in between. When you have done this 3 or 4 times you can take an additional step and use some varnish on the transfer The fabric will become a bit stiffer, but if you do it carfully with thin layers you can obtain a nice result. This last step is recommened for transferring on t-shirts, but if you are just making appliques or transfers that don't need to be washed frequently, you can skip this step.
Ok, that's it! Feel free to post your comments and questions here, i'll try my best to answer them!
|
||||||||||||||||||||||||||||||||||||||||||||||
|
||||||||||||||||||||||||||||||||||||||||||||||
|
monna-1
Trajnica
Pridružen: 18 Travanj 2008 Lokacija: Croatia Status: Offline Bodovi: 2598 |
Opcije poruke
Hvala(0)
Citiranje Odgovor
Objavljeno: 02 Rujan 2009 u 10:45 |
|||||||||||||||||||||||||||||||||||||||||||||
|
Making a Tiny Cupcake out of Polymer Clay
Follow my blog with bloglovin´
OK...so I get a lot of convos on Etsy.com asking me how I make certain products. Here are a few shots of me making a teeny tiny cupcake that will be going into a tiny glass jar. Please excuse the picture quality as I was multi-tasking. The cupcake is only a little over 1/4"     tall. tall.The first picture is just some of the tools that I use. I take pieces of leftover clay and make my own "stamps" to make waffles and other pieces. The second picture is me slicing a tiny ball of pink Fimo clay. This will be the base of the cupcake. I then roll the clay into a tiny ball. Rubber gloves help. I also use a plastic placemat as my work surface. I then score the sides of the pink ball to make the wrapper.  I then use liquid sculpey as an adhesive. A tiny dab will do 'ya. Next, I take a tiny strip of light blue Fimo and roll into a thin strand. I wrap this strand around as the frosting on top of the pink base.   I top the cupcake with a mixture of liquid sculpey and polymer clay. I used a toothpick to swirl it around. Next comes the "sprinkles", which are made of pink glitter. Last, but not least, I top it off with a tiny rolled ball of red Fimo clay for the cherry. Voila!    |
||||||||||||||||||||||||||||||||||||||||||||||
|
||||||||||||||||||||||||||||||||||||||||||||||
|
monna-1
Trajnica
Pridružen: 18 Travanj 2008 Lokacija: Croatia Status: Offline Bodovi: 2598 |
Opcije poruke
Hvala(0)
Citiranje Odgovor
Objavljeno: 02 Rujan 2009 u 11:39 |
|||||||||||||||||||||||||||||||||||||||||||||
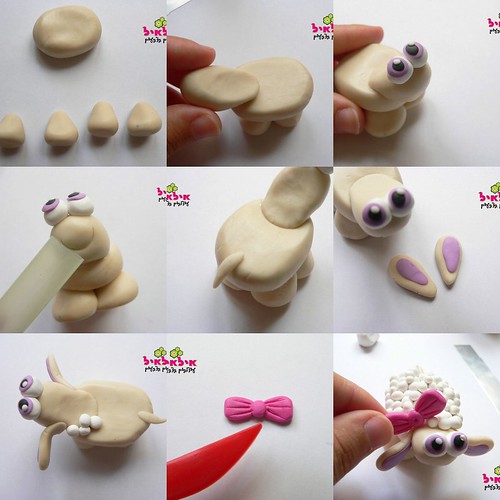
How to sculpture a fimo sheep
  |
||||||||||||||||||||||||||||||||||||||||||||||
|
||||||||||||||||||||||||||||||||||||||||||||||
|
monna-1
Trajnica
Pridružen: 18 Travanj 2008 Lokacija: Croatia Status: Offline Bodovi: 2598 |
Opcije poruke
Hvala(0)
Citiranje Odgovor
Objavljeno: 02 Rujan 2009 u 11:46 |
|||||||||||||||||||||||||||||||||||||||||||||
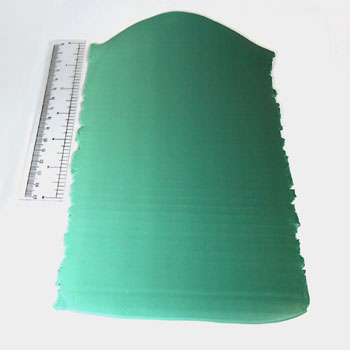
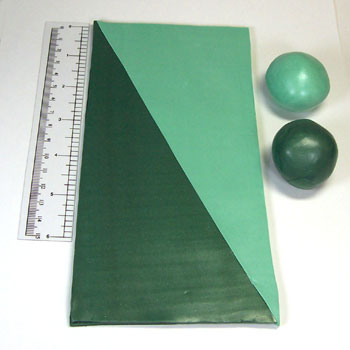
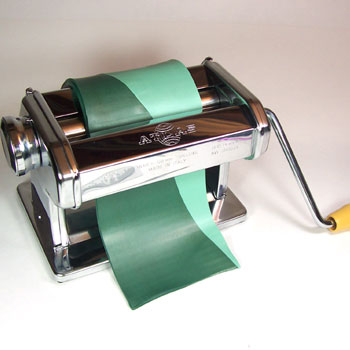
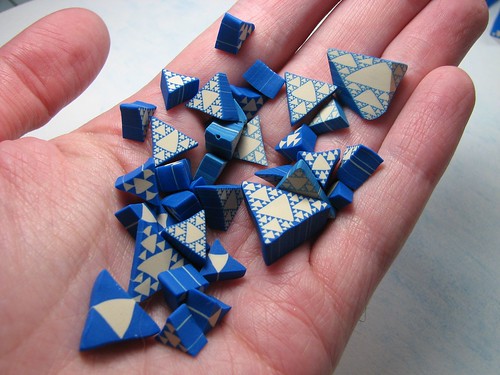
Iterative Algorithmic Plastic Sculpture: Fimo Fractals
|
||||||||||||||||||||||||||||||||||||||||||||||
|
||||||||||||||||||||||||||||||||||||||||||||||
|
monna-1
Trajnica
Pridružen: 18 Travanj 2008 Lokacija: Croatia Status: Offline Bodovi: 2598 |
Opcije poruke
Hvala(0)
Citiranje Odgovor
Objavljeno: 02 Rujan 2009 u 11:48 |
|||||||||||||||||||||||||||||||||||||||||||||
|
||||||||||||||||||||||||||||||||||||||||||||||
|
monna-1
Trajnica
Pridružen: 18 Travanj 2008 Lokacija: Croatia Status: Offline Bodovi: 2598 |
Opcije poruke
Hvala(0)
Citiranje Odgovor
Objavljeno: 02 Rujan 2009 u 11:51 |
|||||||||||||||||||||||||||||||||||||||||||||
|
||||||||||||||||||||||||||||||||||||||||||||||
|
monna-1
Trajnica
Pridružen: 18 Travanj 2008 Lokacija: Croatia Status: Offline Bodovi: 2598 |
Opcije poruke
Hvala(0)
Citiranje Odgovor
Objavljeno: 02 Rujan 2009 u 11:52 |
|||||||||||||||||||||||||||||||||||||||||||||
|
||||||||||||||||||||||||||||||||||||||||||||||
|
monna-1
Trajnica
Pridružen: 18 Travanj 2008 Lokacija: Croatia Status: Offline Bodovi: 2598 |
Opcije poruke
Hvala(0)
Citiranje Odgovor
Objavljeno: 02 Rujan 2009 u 11:53 |
|||||||||||||||||||||||||||||||||||||||||||||
|
||||||||||||||||||||||||||||||||||||||||||||||
|
monna-1
Trajnica
Pridružen: 18 Travanj 2008 Lokacija: Croatia Status: Offline Bodovi: 2598 |
Opcije poruke
Hvala(0)
Citiranje Odgovor
Objavljeno: 02 Rujan 2009 u 11:59 |
|||||||||||||||||||||||||||||||||||||||||||||
|
||||||||||||||||||||||||||||||||||||||||||||||
|
monna-1
Trajnica
Pridružen: 18 Travanj 2008 Lokacija: Croatia Status: Offline Bodovi: 2598 |
Opcije poruke
Hvala(0)
Citiranje Odgovor
Objavljeno: 02 Rujan 2009 u 12:18 |
|||||||||||||||||||||||||||||||||||||||||||||
|
||||||||||||||||||||||||||||||||||||||||||||||
|
Odgovori
|
Stranica 12> |
 Tweet
Tweet
|
| Pređi na drugi forum | Forumska ovlaštenja Vi ne možete objavljivati nove teme na ovom forumu Vi ne možete odgovarati na teme Vi ne možete brisati vaše poruke Vi ne možete urediti svoje poruke Vi ne možete dodati anketu Vi ne možete glasati u anketi |


 Opcije teme


 I usually make small amounts so I can make a test tile first. Weigh 100gr of transparant glaze powder.